
How to Make a Yeast Starter + Infographic
Why Make a Yeast Starter?
Under-pitching yeast can lead several problems with your beer, including stuck fermentation, stressing your yeast, which causes the production of undesired off flavors, and a higher chance of bacteria beating your yeast and ruining your beer. While some yeast does well when directly pitched (dry yeast seems to handle it better than liquid), making a yeast starter is always recommended for beers with an Original Gravity (OG) of 1.060 or more. Making a yeast starter helps you ensure that your yeast takes off quickly, helps you avoid a sudden trip to your local homebrew shop to buy another packet of yeast, reduces the strain on the yeast, and increases the speed of active fermentation.
Luckily, making a yeast starter is something that anyone can add to their process to improve their homebew! Just follow the steps below and check out the infographic, and in 24 hours you’ll be ready to pitch a healthy batch of yeast into your next brew.
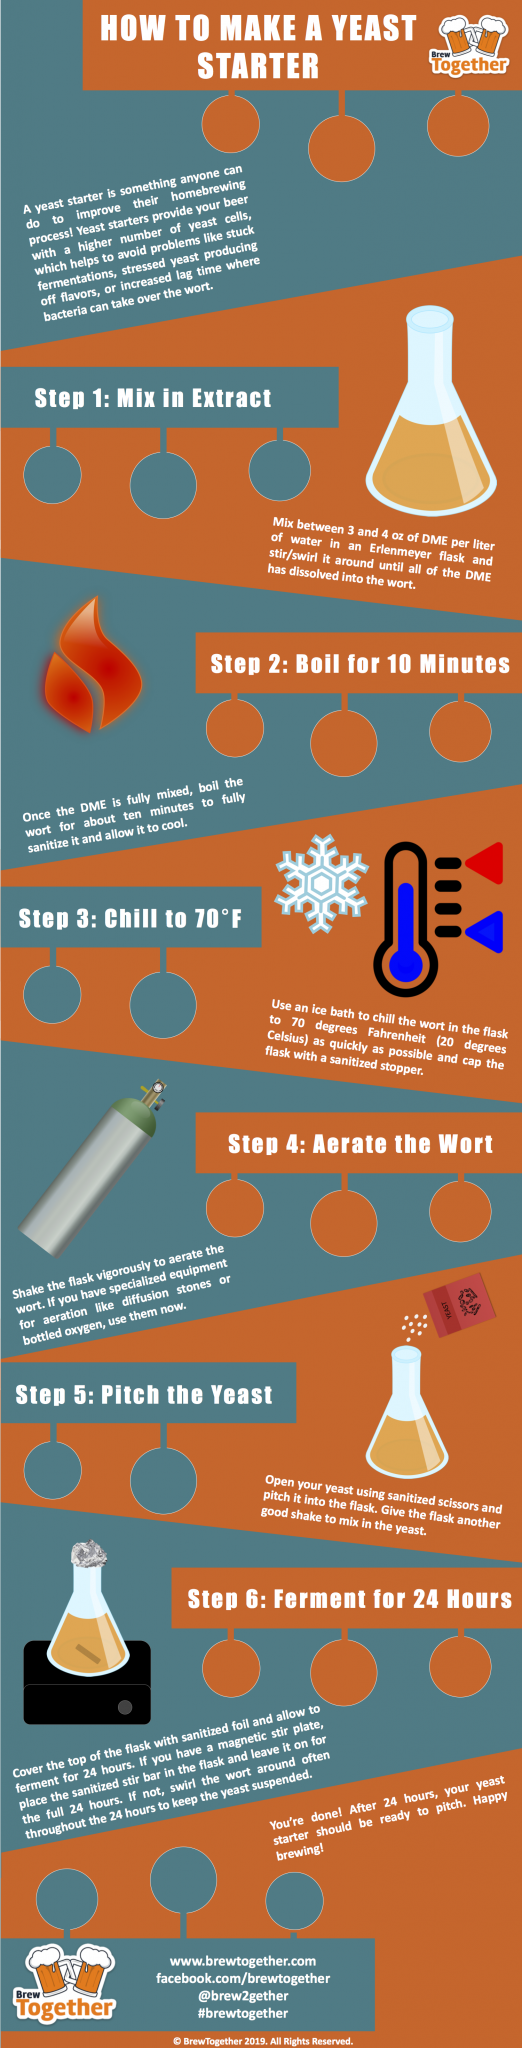
Step 1: Mix in Extract
Mix in between 3 and 4 oz of Dry Malt Extract (DME) per liter of water in an Erlenmeyer flask. Stir or shake the solution vigorously until all of the DME has dissolved completely into the water.
Step 2: Boil the Wort
Once the DME has fully dissolved, boil the wort for about ten minutes to fully sanitize it. Ideally, boil the wort directly in the flask on a small burner or a gas stove. Camping/backpacking stoves seem to work well for this purpose. Once you have boiled the wort, cover the flask and allow it to cool.
Step 3: Chill
Chill the wort to 70 degrees Fahrenheit (or 20 degrees Celsius) by placing the cooled and covered flask in an ice bath. Make sure the flask has cooled to the touch or you risk the flask breaking.
Step 4: Aerate the Wort
Once the wort has cooled to 70 degrees, shake the covered flask vigorously to aerate the wort. You can also use specialized equipment for aeration such as diffusion stones or bottled oxygen to aerate the wort at this stage as well.
Step 5: Pitch the Yeast
Open the yeast using sanitized scissors (better safe than sorry!) and pitch the yeast into the flask. Re-cover the flask and give it another good shake to make sure the yeast is fully mixed into the wort.
Step 6: Ferment for 24 Hours
Cover the top of the flask with a sanitized piece of aluminum foil and allow it to ferment for 24 hours. If you have a magnetic stir plate, place the sanitized stir bar into the flask, place the flask on the stir plate, and leave it turned on for the full 24 hours. If you don’t have a stir plate, swirl the wort around in the flask as often as you can throughout the 24 hours.
After 24 hours, you should have a healthy, happy batch of yeast ready to pitch. Happy brewing!
Do you use a yeast starter? Join the discussion about yeast starters in the forums or leave a comment below!
Did you like this article and infographic? It would mean the world to us if you could share it on your favorite social media platform using the share links below!
Affiliate Disclosure: BrewTogether is a participant in the Amazon Services LLC Associates Program, an affiliate advertising program designed to provide a means for us to earn fees by linking to Amazon.com and affiliated sites. BrewTogether is also a participant in an affiliate program with MoreBeer, our favorite online homebrewing equipment/ingredients retailer. Some of the links in this article are affiliate links, which means that if you choose to make a purchase after clicking the link, I will earn a small commission at no additional cost to you. Please feel free to reach out with questions. Thank you for your support!


Responses